

We Have Moved! :-)
19 Feb 2013 3 Comments
in NEWS! Tags: blog, new, news, seasonalhome.wordpress, site, The Seasonal Home, The Seasonal Home blog, website

EXCITING NEWS!
The Seasonal Home has launched a new website!!!
For the last 4 years,
I’ve been blogging at http://www.seasonalhome.wordpress.com
but now, you’ll find me at:

Click on the yellow button (above) to come take a peek at my website and its fun,
NEW FEATURES:
- No more scrolling through a long roll of blog posts – simply choose your favorite CATEGORY from 29 Photo Buttons
- Ideas at a glance! Once you click-on a CATEGORY, you’ll find a list of my ideas for that topic. We are still adding
“at a glance” photos for each idea, so please pardon our dust. - Photos of my most recent 4 blog posts will be continually scrolling across the top of the HOME page, so you can click on them.
- Next to the current posts will be a short list of the day’s MOST POPULAR posts
- Buttons, leading you to all my Social Media sites, now located at the bottom of every page:
YOU TUBE
FACEBOOK Community Page
(for more weekly inspiration and Prize Contests)
- Share your COMMENTS and QUESTIONS using my new email address: Eileen@TheSeasonalHome.com
If you’ve already signed up to receive my blog posts by email, we are working hard to make sure that information transfers correctly. However, if you do not receive a SPRING/EASTER idea this week, please make sure your inspiration is uninterrupted by going to our new site (www.TheSeasonalHome.com) to re-enter your email address where you see “Subscribe to receive blog posts by email“.
I’ll see you there!
EILEEN
P.S. By the way, if you like my new site, it was created by http://www.Max Lutz.com, a talented website designer! You’ll find his website link on my HOME page too.
Food Ideas for Valentine’s Day
11 Feb 2013 2 Comments
in VALENTINE'S Day Tags: Breakfast, Cocoa, cookie, Creative, dessert, Dinner, drink, drinks, food, fruit, Heart, heart-shaped, Ice Cream, ice cubes, ideas, pizza, recipe, recipes, salad, shapes, St. Valentine, ST. VAlentine's DAy, tomato, unique, Valentine, VALENTINE'S Day
I love creativity, especially when it comes to
food design ideas during the holidays!
The following are some creative ideas I found on the internet and Pinterest, for Valentine’s Day.
They inspired me so I’m sharing them with you…
Enjoy the Creativity!
EILEEN

Red ice cubes in a white drink, or…

white ice cubes in a red drink?
Either way, it’s heartfelt! LOL

Add marble before filling to create heart-shaped cupcakes

Cocoa with Marshmallow Heart –
cut from the large Kraft
s’mores marshmallows

courtesy of Bakarella

Cut slit in cookie prior to baking

Cinnamon Hearts made from slices of refrigated cinnamon rolls

courtesy of Land o Lakes

My kind of breakfast!


Directions for making heart-shaped tomato


These are mine!
Look for the simple, easy directions
under my RECIPE tab.


Bargain Alert!
06 Feb 2013 Leave a comment
in AROUND THE HOUSE Tags: bamboo, covering, curtain, Decor, Decorating, DIY, Dollar Tree, fence, fountain, Garden, Handmade, home, Idea, ideas, Inexpensive, lamp, mirror, pergola, planter, poles, rod, Store, tiki hut, vase, Wedding
I found a great product, just arriving in The Dollar Tree stores, that won’t last! And if you don’t think you need them, you may change your mind when you check out the suggestions I have for their use!
What is it? Large bamboo poles (apx. 5 ft. tall x 1″ – 2″ in diameter). Although they vary slightly, in height & diameter, I found most of them to be fairly large. Typically, bamboo poles cost $5-$7 each in DIY, craft or floral supply stores and make great decorative accents. At this price ($1.00), they are very affordable and will provide inexpensive inspiration for you!
Here’s what they look like (in the store) to make it easier for you to spot them, or when asking your local Dollar Tree staff where to find them. I found them hovering between the (teeny) craft section and toy dept.

Distance photo (for size scale)

By the way, I didn’t see this item on their website, so it is probably an “in-store” item only.
The first (and easiest!) suggestion I have for you is to place a few inside a large planter, vase or pot to use as a trending, contemporary and nearly care-free decoration (just a little dusting once in a while). It would look great inside OR (because they’re weatherproof) outside, as seen in one of the photos below:

Consider a greenery base to avoid dust inside the container

The perfect accent with the current, popular trend of Asian decor

Add lighting (in container) for a super-contemporary look

Because they are weatherproof, they make the perfect outdoor accent
Another great idea is to use them to create your own fencing. There are tons of DIY instructions for many versions of this type of project (on the internet),
from easy to complex!


You could also use them as inexpensive curtain rods, “as-is”, spray painted or bundled!

photo courtesy of The Gardener’s Cottage.
For a thicker rod, bundle several together & use 2 pre-made finials or unique wine bottle stoppers as finials
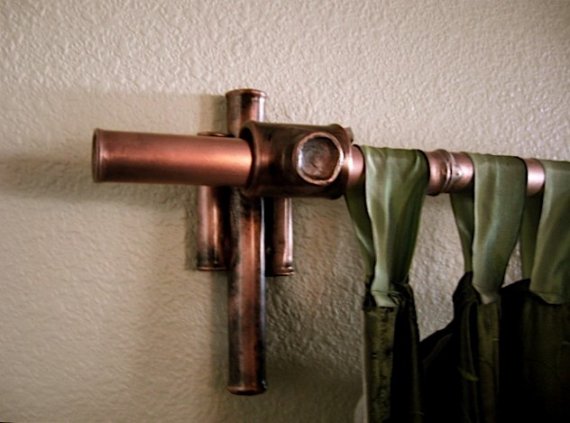
photo courtesy of etsy shop “Copper Bamboo”
And if you’re handy enough to hang a couple of rod holders on the wall, you could use them as a shower curtain rod in a tropical-themed bathroom:

Create your own floor lamp! Or cut smaller pieces for a table lamp.

Or how about an accent to a wedding reception centerpiece?

Need something sturdy to help you support your garden greens?

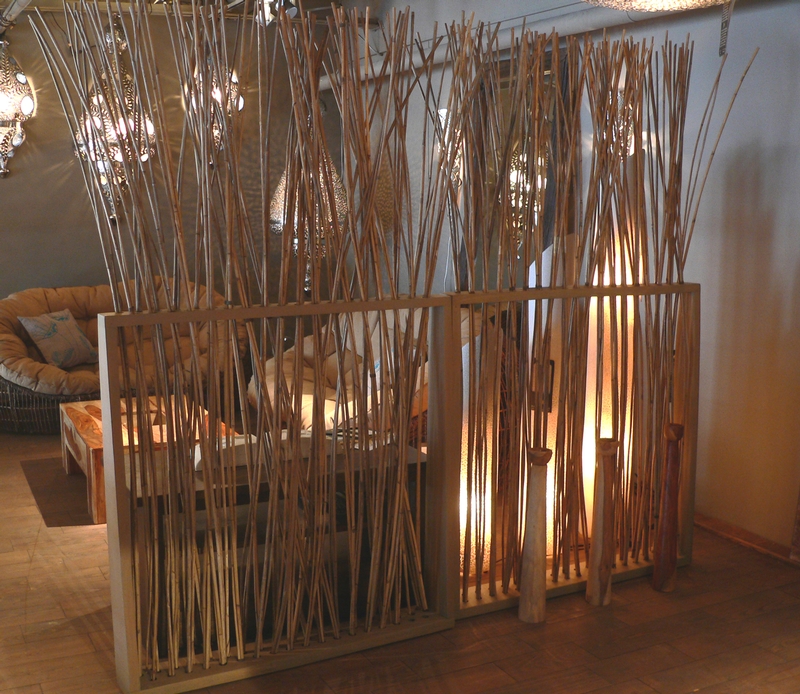
How about making a DIY frame to hold bamboo creating an inexpensive Privacy Screen… inside OR outside your home?
Adding some lighting creates even more ambiance!
OR, do you need a privacy screen from the “Sun”? Then, use them to create a cover for your pergola.

photo courtesy of Beautiful Bamboo Blogspot
Ok, as long as we’re talking back yard, HERE’S a project for ya! Buy a bunch to create your own Tiki Bar. LOL 😉

I absolutely LOVE how great they look glued to the back OR front of a mirror to create inexpensive wall art!
[clicking on either of the next 2 photos will open a separate internet window with each of these creative blogger’s free tutorials]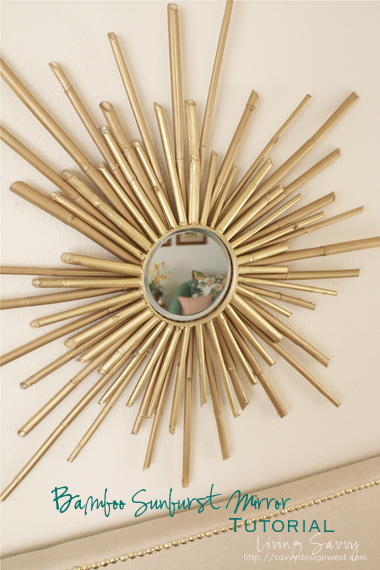
photo courtesy of Savvydesignwest.com
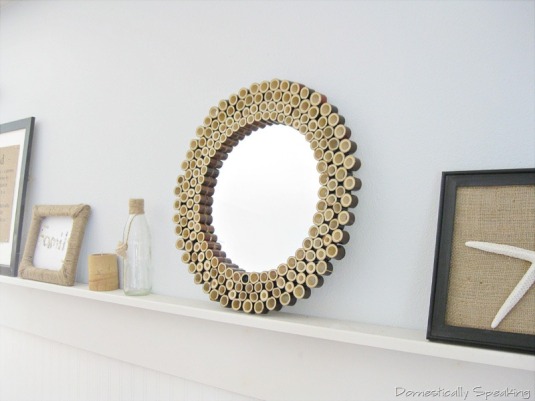
photo courtesy of Domestically Speaking blog
And, of course, my favorite…. as part of a fountain… ahhhh serenity!

photo courtesy of Saaffect.wordpress blog
Enjoy the Creativity!
EILEEN
The Seasonal Home “News”
03 Feb 2013 2 Comments
in NEWS! Tags: Facebook, fans, followers, iVillage, The Seasonal Home blog, VALENTINE'S Day
There’s a lot of great things happening at…
The Seasonal Home!

Last week, we zoomed right past
6,000 Fans
on our Facebook Community Page!

If you’re on Facebook and haven’t “LIKED” The Seasonal Home’s Facebook Community Page yet, you’ve missed out on a lot of FREE PRIZES as well as all of the “extra” inspiration posted there, so please… JOIN US! 🙂
♥
We will be launching a brand new look on our web site in February!

Although it will still look very familiar… when you search a Season, Holiday or Topic, it will be much easier to navigate. This will all make sense when the new design launches this month.
♥
We’ve been featured again!
The Seasonal Home is being featured (through Valentine’s Day) on a huge, international website – iVillage.com
Owned by NBC / Universal, iVillage is the largest content-driven community for women online reaching 30 + million unique visitors per month (comScore). Everyday women come to iVillage to connect, share advice, find life tools and engage in conversations that matter most to them in areas of Pregnancy & Parenting, Health, Food, Entertainment, Home & Garden and Beauty & Style.
The Seasonal Home is showcased in their “Featured” section, as part of a slide show titled:
” Add Love to Every Room! 21 Ways to Decorate Your House for Valentine’s Day“
(click on the above link to check it out!)As if that were not exciting enough….
my design was chosen as the slide show COVER
AND they featured 3 of my blog posts.
I am so honored!!!

So, thank you for supporting, spreading the word about and staying tuned to
THE SEASONAL HOME…
2013 is going to be a great year!
♥
EILEEN
Shabby Chic Valentine Fireplace
28 Jan 2013 6 Comments
in VALENTINE'S Day Tags: ANgel, Be Mine, bird, candle, Cherub, Decor, Decorating, Decorating Idea, Decoration, Garland, Heart, Love, mantel, Mantle, Rose, rose petals, Roses, sign, ST. VAlentine's DAy, Sweetheart, Valentine, VALENTINE'S Day, Wreath
[As always, click on any photo to view it larger]
Time to decorate the fireplace for Valentine’s Day!
It can look so much nicer to hang something large and Valentine themed over (and under) a mantel full of decorations because it enlarges the look of your festive display. But, one problem is that Valentine themed art is very hard to find and can be expensive so why not create your own?
Step 1 – search your local thrift store for a wooden frame.
A wooden frame can be any color because it’s easy to paint. I found this one last year (it was a dirty, dusty brown color) and painted it white to create a shabby chic look to use in some Spring themed decor.
For Valentine’s Day, I added a red, beaded garland (using spots of hot glue, here & there to secure it) to the frame temporarily and displayed a lightweight wreath of roses from a bow and ribbon in the center of the open frame. Viola!
HELPFUL HINT: I hung the frame on an existing nail, but you could also attach the bow to the top of the frame and lean it against the wall.


Step 2 – “new-purpose” old decorations!
A common thread you will notice in my style of decorating is that I re-use (or “new-purpose”) decorations I already own and many times, for a different holiday! Do you remember the faux fern I used to border the snow under my Fairy themed Christmas tree a couple of years ago? Check out how nice it looks along the back of the mantel with last year’s Dollar Store roses and a $1.00/pkg. of pink, glittered hearts (Dollar Tree) tucked in. It serves as a beautiful backdrop to my sweet Cupid, 2 heart-shaped topiaries and faux rose petals on the mantel.

And just in case you were wondering how roses might look on a tree, for Christmas, check out the rose-themed tree I designed for a client.
Also, if you have a large Valentine sign (like this “BE MINE” from Home Goods), you can use it to decorate the front of a mantel, by removing the hanger and using “Tack-it” (temporary gummy adhesive) to secure it in place for the holiday. I just love how these 2 additions simply & inexpensively enlarged my Valentine’s Day mantel design.

Step 3 – Don’t forget the details! I’ve had my sweet, little Angel for a long time, but this year (for the first time) I happened to notice that she had a tiny bird on her shoulder. Keeping in mind that LOVE comes in all shapes & sizes, I used my hot glue gun to add a small heart to his beak because… of course, he would bring her a little Valentine’s Day greeting!

And if you like the little glass votive candle holder I placed in front of my Cherub, it was super easy to create! The glass votive is a plain one I purchased at the dollar store and added the word “LOVE” to, using my favorite self-adhesive vinyl letters (see office supply stores for these, in all fonts & sizes). You could also use a stencil and paint or etching cream to add a heartfelt sentiment. The candle was even a bargain because I purchased it after Christmas for pennies!
Enjoy the creativity, and…
HAPPY VALENTINE’S DAY!
Eileen
Creative, Re-purposed Decorations for Valentine’s Day
22 Jan 2013 7 Comments
in VALENTINE'S Day Tags: Apothecary Jars, Cake Plate, Chair, Chairs, children, Christmas Decorations, Conversation Hearts, Cupcake, Decorating, Decorating Idea, Decoration, Department 56, Foyer, Garland, grandchildren, grandkids, Hearts, Kids, kitchen, photo frame, Pillows, Recycle, Repurpose, Sweetheart, Valentine, Valentine Cards, valentine tree, VALENTINE'S Day
[As always, click on any photo to view it larger]
Call me creative or just plain lazy (LOL)…. but this year, I kept up a few of my Christmas decorations and re-purposed them, with a “Valentine” look.
Remember this pretty garland? 
Once I removed the ribbon, “Merry Christmas” sign and the tabletop decorations, I noticed how beautiful and wintry the greenery looked, so I just added some glittered red hearts (wall hangings cut-apart from the dollar section of Target), red velvet heart picks from The Dollar Store and my “smooch” stickers (purchased a few years ago).
Total cost to take it from Christmas to Valentine’s Day: $3.00

And remember this tree?
I replaced the hanging ornaments (on the curtain rod) with a simple valance I sewed, using $3.00 worth of fabric from Wal-mart and added a $3.00 felt heart garland from Target to trim it out.
The tree ornaments are 3-piece, glittered Valentine wall hangings (from the dollar section of Target) that I cut apart and used alongside cardboard hearts (removed from a $4.00 Walgreen’s wreath). I added one new thing that softened the look of the white tree and made a wonderful garland – inexpensive light pink feather boas! For the base, I made a pink cupcake liner (from poster board) to replace the blue (Christmas) one and exchanged the glittered ornaments, tucked in the pink frosting (spray painted polyester batting) with sprinkles, which I made from leftover poster board and paper. The Christmas tree was bright and happy, whereas the Valentine’s Day tree is soft and sweet!

I’ll be hosting a Valentine themed meeting next month, so I test-drove the table cover, dishes and chair decorations to see how they’ll look too. I’m loving this lush, pink color! And by the way, the chair decorations are nothing more than another glittered “Conversation Heart” wall hanging I also found in the dollar section at Target and tied on the back of the chair with an inexpensive piece of ribbon.

It was fun to fill my cabinets with Valentine goodies too and I re-purposed some Christmas decorations there… can you spot them?


Remember this cookie tree from Christmas? 
I covered the star (on the top) with a couple of the cardboard hearts and of course, placing it next to a couple of Valentine cupcakes creates an instant Valentine’s Day treat!

Remember this cake plate with a red bow, from Christmas? 
It’s just as cute under a Department 56 Valentine house! 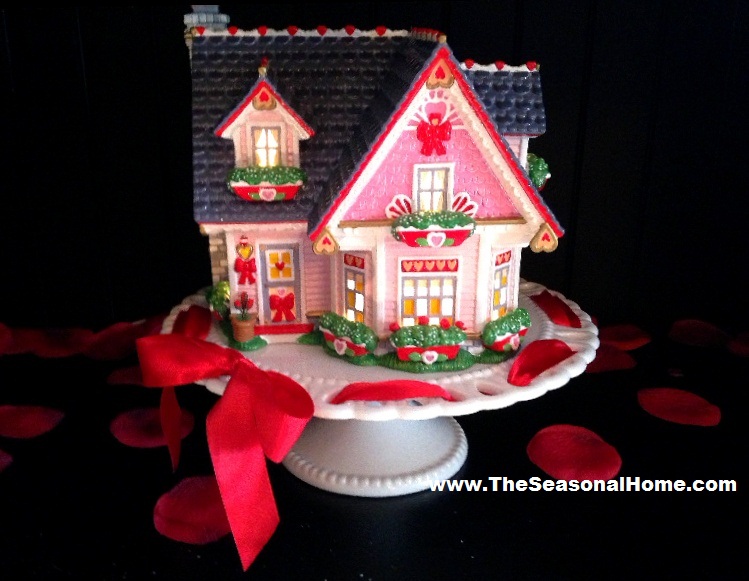
I use my apothecary jars year round, including Christmas. I changed the candy, in several of them to Conversation Hearts (for Valentine’s Day) but kept the pastel jelly beans in one because the colors were perfect!


Here’s an idea you might want to try – use apothecary jars as frames by adding a few Conversation Hearts and tucking your photos or vintage Valentine Cards inside. You could display photos of you and your sweetie or your kids/grandkids. It’s just a different way to display photos or other keepsakes without purchasing a separate & costly Valentine’s Day frame. And hey… it makes a real conversation piece too!

Stay tuned for a Shabby Chic idea for Valentine’s Day (blog post) next, coming up in a couple of days!
HAPPY VALENTINE’S DAY!
Enjoy the Creativity…
EILEEN
Spread a little “LOVE” with your Valentine Car
16 Jan 2013 Leave a comment
in VALENTINE'S Day Tags: Auto, Automobile, Car, dishwasher, grill, happy, Heart, Hearts, Love, magnet, magnets, mood, refrigerator, ST. VAlentine's DAy, Valentine, Valentine's DAy decoration, Valentine's Day Wreath, Wreath
Valentine’s Day is coming soon and (I’ll bet you would have never guessed this, but…) I love to decorate my home for this holiday of hearts. 😉
This year, I decided to spread the message of “LOVE” a little further, by adding a few hearts to my car. People add wreaths, ribbons & lights to their cars at Christmas time, so why not express a little JOY for Valentine’s Day too?
 It was easy & inexpensive to do. I found a glittery, weatherproof Valentine heart at Michael’s Crafts and added self-adhesive, felt pads to the back (to protect my car) and finally, zip-tied it to the front grill.

Next, I found some fun, inexpensive Valentine magnet sets. They’re marketed for display on a refrigerator or dishwasher, but I added a few to the back of my car. There are so many in the package, that I can share with neighbors, family & friends!
(If you are unable to find the magnet sets, I have a limited supply in my SHOP)

So, if you decide to spread a little “LOVE” around your own town, it won’t matter if the other drivers are in front of or behind you because, either way, they’ll enjoy your subtle message of “LOVE”… and I’ll bet it brightens their day too!!
Enjoy the Creativity!
EILEEN
Cure the Winter Blues with a FUN Snowflake Breakfast!
08 Jan 2013 6 Comments
in Winter Tags: blues, Breakfast, Design, Idea, morning, pancake, red and white, snowflake, Winter
[As always, CLICK ON any photo to view it larger & in more detail]
With the holidays behind us (booooo), I tend to get a little down 😦 so I came up with a fun, new Winter tradition to pick up mine and my family’s spirits … The Snowflake Breakfast!
 STEP ONE – look for a metal, snowflake-shaped cookie cutter. I just found a 4-pack at Wal-Mart for $2.88 that’s probably on sale now (woo-hoo!). The reason you need a metal cutter is so it can withstand the heat of your frying pan or griddle.
STEP TWO – dust off your favorite recipe to whip up a batch of pancake batter. Mine is chocolate chip! 🙂
STEP THREE – spray your frying pan or griddle AND the “inside” of a large snowflake cookie cutter with non-stick cooking spray.

STEP FOUR – Spoon some pancake batter into the snowflake cutter, spreading it evenly into each arm of the snowflake.

STEP FIVE – Brown the pancake on 1 side and use a spatula and the side of your pan to help you flip the pancake AND snowflake cutter (together) to begin browning the opposite side of the pancake.

STEP SIX – While the opposite side of the pancake is browning, use a knife to begin loosening it from the side of the snowflake cutter.

STEP SEVEN – Gently remove the snowflake cutter, and when done, remove the pancake from the pan.

STEP EIGHT – Make an inexpensive snowflake tree to use as a centerpiece on your Snowflake Breakfast table! Gather branches from outside and spray paint them white. HINT: Leave any berries or buds on the branches for added texture and detail. Cut a piece of styrofoam to fit in the bottom of a vase you have on hand. Arrange the painted & now dry branches in your vase to create a winter tree, using the styrofoam to hold them in place. Disguise the styrofoam with inexpensive Epsom Salts to simulate fresh fallen snow.

STEP NINE – Hang snowflakes in any windows and on the branches of your new winter tree and place in the center of your breakfast table.

STEP TEN – Years ago, I was lucky enough to find snowflake plates at J.C. Penny (on clearance.. whoo-hoo!) and snowflake glasses at Target, but you can use paper plates with a snowflake theme to duplicate this look on a budget. I found the over-sized white snowflakes at a dollar store…. they make great place mats! Finally, I recycled my snowflake pillows, lantern and snowflake candle (used in the family room at Christmas) to create more wintry ambiance on the side table underneath my window of snowflakes.

Check out the entire Snowflake Breakfast setting… it’s festive and happy and because it’s “the unexpected”, it will provide everyone in your home with the perfect prescription for the post-holiday, winter blues!!

Enjoy the Creativity!
EILEEN
Christmas Storage Tricks & Ideas
03 Jan 2013 4 Comments
in CHRISTMAS Tags: Artificial, Bins, CHRISTMAS, Containers, crates, Drawers, Garland, ideas, multi-drawer, packing, Plastic wrap, ribbon, storage, Storage Units, Tree, Trunks, Wreath
Lately, I’ve received a lot of questions from readers about how I store all of my holiday decor. Although I probably have more than most (due to my profession as a holiday designer), I’m going to share some of my storage tricks with you and provide you with some ways to modify it to a more modest collection.
My holiday decor is kept in an on-site storage area that’s only 120 square feet. I can work easily in such a small area because everything is organized by color, holiday theme or “type” of decoration and kept in drawer units, a few tubs or plastic-wrapped to take advantage of vertical storage space.
My favorite storage tools are: storage carts, plastic shelving and plastic wrap.
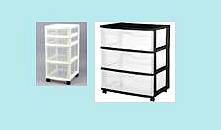
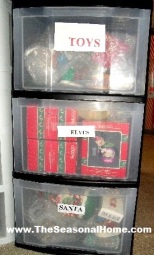
Multi-drawer Storage Carts come in all heights, widths, depths and some even have varied drawer sizes. The varied drawer sizes are useful because you can place small things in the narrow drawers (like icicles, snowflakes, ribbon, ornament hooks, etc.) and larger things in the wider/deeper drawers (like ornaments, tree skirts, tree toppers, etc.) Typically, these drawer units come with 4 caster wheels, which makes them easy to roll into the house and around the room you’re decorating. When you remove the wheels, they are easy to stack to create more vertical storage, which is how I use them to separate my ornaments by color and my decorations by theme. I also LOVE the fact that I can easily grab a single drawer of what I want rather than waste time and energy digging through a container full of everything.
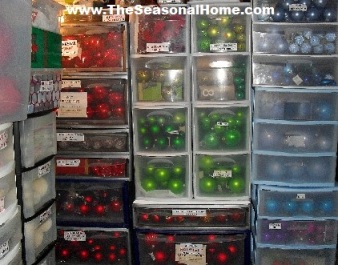
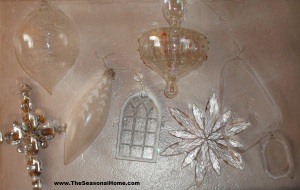 If I happen to have a lot of “different” decorations in a drawer together (because they are the same color), I take a photo featuring 1 of each decoration and tape that to the outside, for a quick visual reference when I’m designing.
I even use the space on top of my stacked drawer units for storing larger items as well as my collection of tabletop trees, keeping them dust-free by loosely placing dry cleaner bags over them: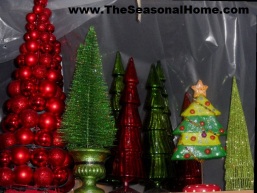
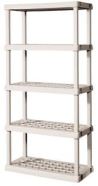
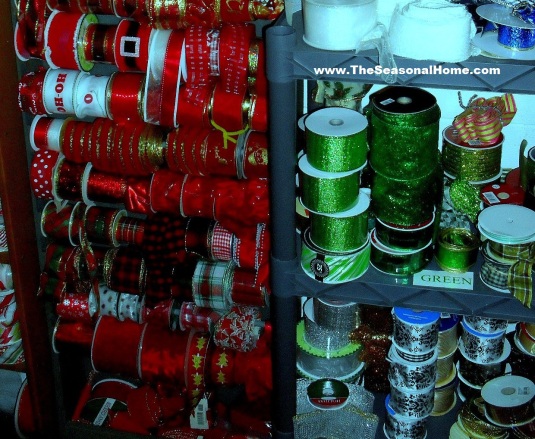
My ribbon collection is quite voluminous because I purchase it on clearance whenever I find a good deal. I purchase several rolls (at least 30 yards) so I can decorate mine or a client’s tree, wreath and garland (minimum) to coordinate. Many people keep larger ribbon collections in plastic tubs or bags, but that can become a quick mess if you don’t secure the end of an open roll of ribbon. I keep my rolls of ribbon on wooden dowels or on an inexpensive plastic shelving unit, by color:
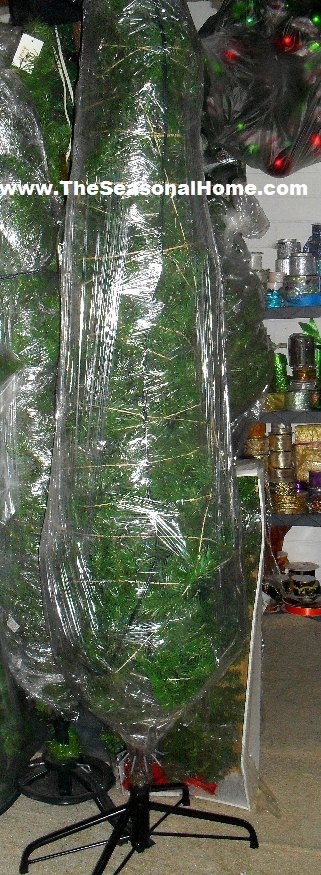
Artificial trees and wreaths can sometimes take up a ton of horizontal space, especially if you try to stuff them back into the boxes they came in. So, I wrap them both in plastic wrap to store them vertically and keep them dust-free. Also, by the time I’m ready to wrap things up for storage, those cinnamon-scented pine cones are on clearance at the craft and mart stores, so I purchase a bag and tuck a few in between the greenery for a wonderful, scented surprise the next time I unwrap my holiday greenery.
To wrap an artificial tree, I gather my scented pine cones, a roll of inexpensive twine, a small roll of packing tape and I remove the roll of plastic wrap from it’s box/container. If your tree is not hinged, however, this method will not work. But if it is… begin by flattening each row of branches. Knot one end of your roll of twine onto a piece of greenery, near the top of the tree. Then, starting at the top, lift up an entire row of the flattened branches and secure it in place vertically by wrapping the twine around it, pulling it tight. While holding the twine tightly, lift up the next row of flattened branches and wrap the twine around that row, pulling it tight. Repeat this process down the entire tree and I have to admit that it’s easier if you have a helper. 😉 Once all of the branches are vertical and wrapped tightly in twine, tuck in a few scented pine cones and wrap the tree in plastic wrap… horizontally and vertically. HINT: I push a piece of greenery (at either end of the tree) through a hole I create in one end of the plastic wrap before I begin wrapping, to hold it in place. When the tree is wrapped entirely in plastic wrap, secure the remaining loose end with a piece of packing tape. Below is how it will look when you’re done and as you can see, using this method keeps their footprint small and makes it easy to nestle several trees very close together:
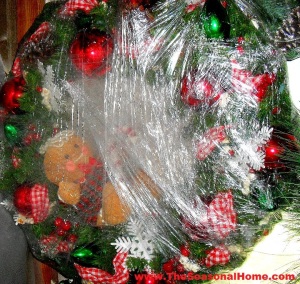
If you want to wrap up your wreath (keeping it decorated) lightly push the outside wreath branches upward, tuck in your scented pine cones, attach one end of the plastic wrap to one branch and begin wrapping around the entire circumference (under and over) until its completely encased in plastic wrap. I hang my wreaths (decorated or not) on a nail in the wall above my storage drawer units, but if you have a free space on the back of a garage door, use a wreath hanger to store it there. Also, you can use additional wreath hangers (attached to the bottom of the top wreath) to hang a 2nd or 3rd wreath below the first one.
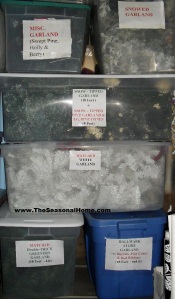
 Wrapping garland is a little hard, so that’s one of my holiday items I place in large containers and add scented pine cones to. As you can see, I also note important details and tape those notes to the outside of the container:
I hope sharing these tricks helps you with your holiday decor storage issues. If you have any questions or need suggestions, please feel free to contact me! 🙂
Enjoy the Creativity!
EILEEN


